Blog Design

_________________________________________________________

Saturday, August 31, 2013

More on Seramis Orchid Mix

So after trying the regular Seramis clay granules for houseplants for over a week and having good results; the media held the water longer, but remained aerated and the look and texture of the roots was improving, I decided to order my very own bag.  I ordered from www.seramis.com.  I found out that the distributor here in the US is located in Germantown, MD.  Additionally, I wanted to try the actual mix that was specific for orchids.

It turns out that Seramis in the US is now a subsidiary of Mars, the candy and pet food company.  Once I received my shiny yellow bag of media, I repotted both my Phals.  I left the mix dry until tomorrow morning when the orchids get their monthly dose of liquid kelp.  This batch of Seramis is mixed with some type of bark.  I am looking forward to continued good results and hopefully, having my Phals grow some new healthy roots.

___________________________________________

Update

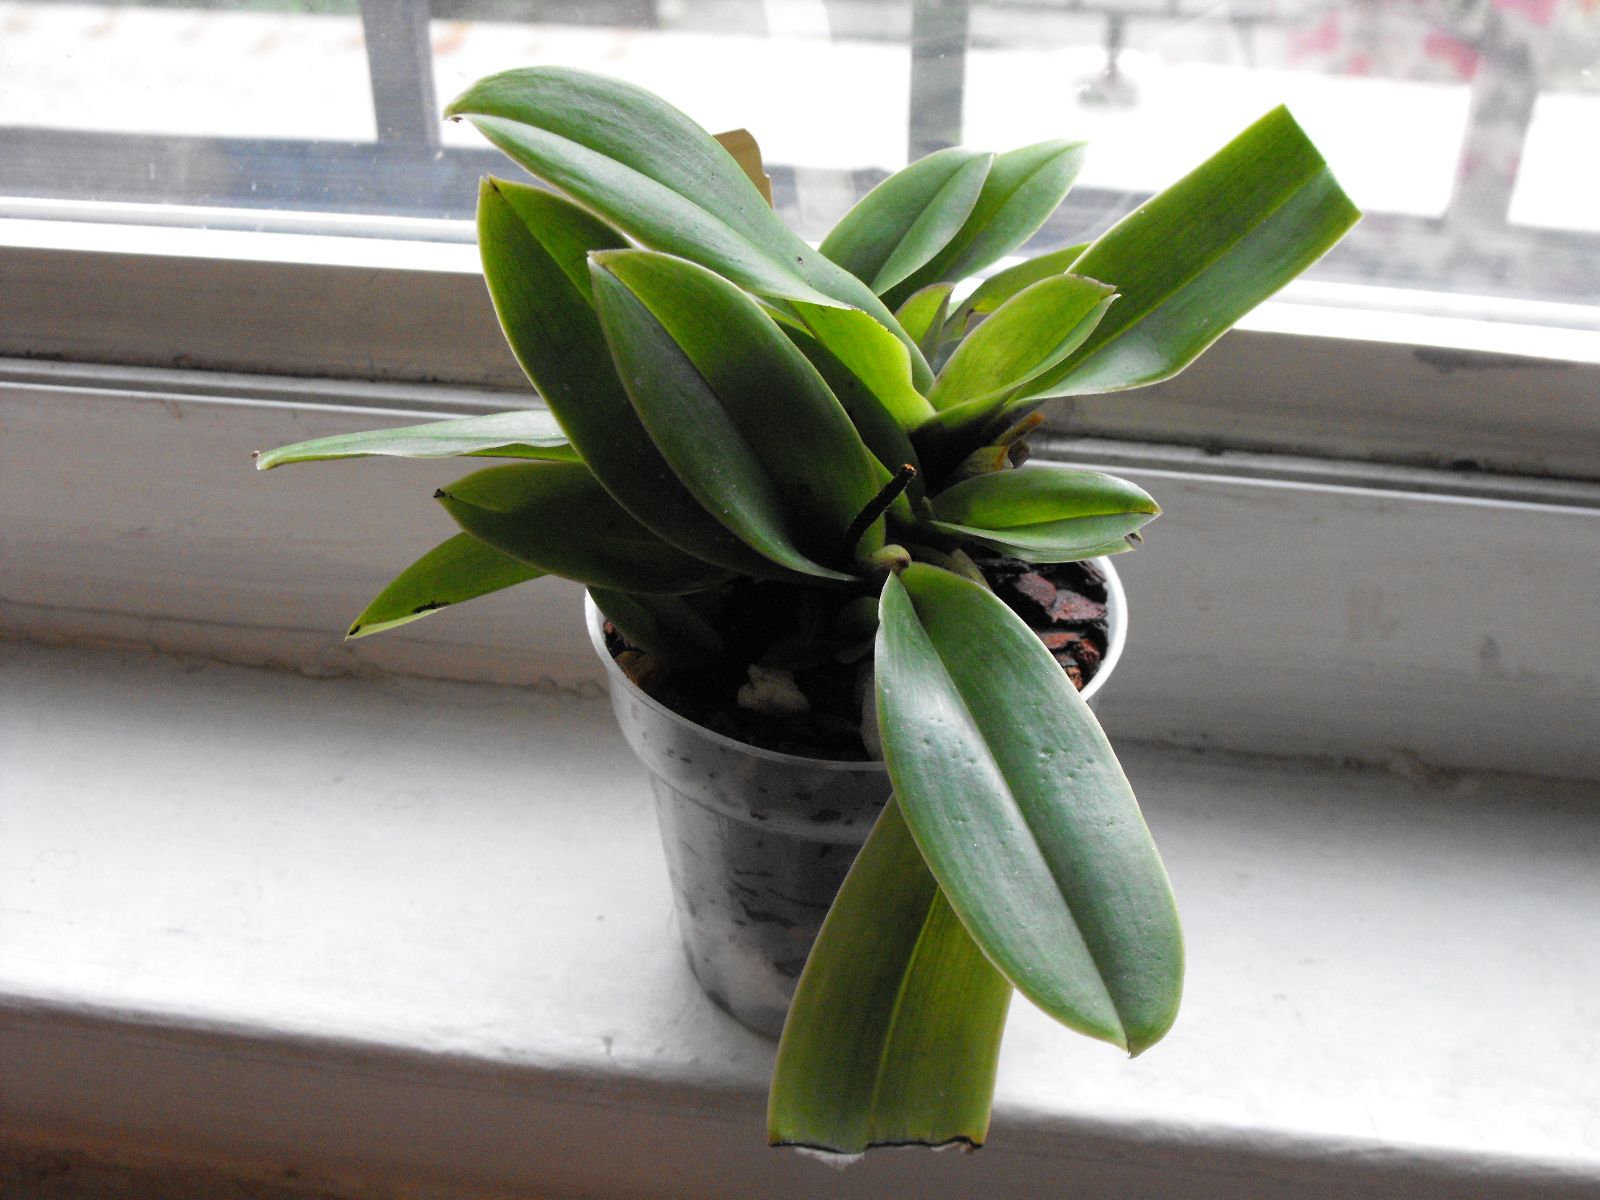
Since I repotted both my Phals into the Seramis Orchid mix, I have noticed that Snow White's roots have plumped up significantly.  She's been in it, for about 2 weeks or so.  At first, I potted her roots very shallow and they were exposed to air for about a good week or so.  After that initial week, I buried most of her roots a bit deeper, but left the media nice and airy.  I made no effort to pack in the Seramis, but only to cover the roots.  I have been watering her every 3-4 days and in between, I have been spraying her leaves with a weak mixture of water and Superthrive.  Her roots are now nice and green and very plump.

Her roots had black rotted spots scattered through their surface and were stained
brown from repeated fertilizer application


Her air roots as well as the ones in the media are a nice healthy shade

Of course, as the roots improve, the plant also takes a turn for the better in regards to its physical appearance:


Her oldest leaf yellowed and died.  Since I purchased her with 3 flowering spikes, I decided to sacrifice the last of the flowers, which were about to die in a few weeks anyways.  I trimmed the triad of spikes down to the base to ensure the plant would concentrate on repairing itself rather than producing or maintaining old blooms.  Since then, she has also put out a new leaf in the center, which is growing at a good pace.


Audrey 2, on the other hand, is not doing so well at the moment.  I am watering her a lot more conservatively until she recovers a bit more.  I transferred her over to a clear homemade pot and made numerous ventilation holes throughout its surface.  With the new mix, her roots should recover nicely and she is already working on putting out a new leaf:

These roots are still off colored and still rather stringy


New leaf growing

So far, I would have to admit that the Seramis Orchid mix has been a positive addition to my culture!

Friday, August 23, 2013

Orchid Updates

This post is just to report back on how all my plants are doing.  Of course, some are doing better than others, and some plants just seem overall hardier than others.  Right now, my problem child is Rocky.  After attempting to remove an old yellowing leaf, an incoming fan right in the center of the plant, simply tore right off.  This was Rocky last week before his trim:

Judging by appearances, everything looks fine here

His foliage appeared full and green, but once I started to inspect the center of the plant to detach that left lower leaf, I discovered the center of the plant was black with rot.  To be honest, I was not entirely surprised.  After all, he was not in good shape when he was initially shipped to me.  I am trying my best to save him and he appears to be trying to grow, but those roots are still in horrible shape.  They are not any worse than when I received the plant so in a way, I do consider there has been some progress, but no new roots are growing at this time.  So, after my attempt to clean him up yesterday, this is what his foliage looks like now:


Upon closer inspection:


The important thing is that now air will get in between those leaves and heal much faster since the plant will remain drier.  Gathering from everything I had read, Paphiopedilum Spicerianum is a good grower.  It may be compact, but it has a rep for being easy to grow and quite prolific.

With all my Paphs, particularly the ones in distress, I have been feeding lightly, watering generously every couple of days since my conditions are quite dry, adding dolomite to the mix, and I have been using liquid kelp once a month to stimulate root growth.

My second most needy plant is my newest, Kalista.  She arrived quite bruised from being shipped.  She was also pretty dessicated and the leaves were mangled all together.  She also seems a bit discolored as if she had been exposed to way too much light.  Here is Kalista after almost a week of arriving in her new home:


She still needs a little more time, but she is recovering nicely.

In the opposite end of the spectrum, my success story has been my Paphiopedilum Oberhausen's Diamant, Marilyn.  She was fine until the middle of July or so when we had a bad heat wave and our family went away on vacation.  This, and the fact that I did not have a dedicated fan for the orchids, spelled heatstroke.  Out of all my orchids, she was the one that got it the worse.  Her foliage began drooping.  At first, I thought it was some type of fungal thing so I treated her with fungicide, which ended up burning her roots.  So, instead of helping, I ended up making maters worse.  She began to recuperate from the root abuse slowly, but was making steady progress.

Then, about 2 weeks ago, one of her leaves began yellowing and she began displaying numerous brown spots on the yellow leaf.  Again, my inexperienced instincts screamed out fungus or some type of rot, but a more experienced grower, recommended adding dolomite to the media for my Calcicolous Paphs.  The dolomite worked.  She is now doing much better.  You be the judge:

Before


After

And here is my collection; everyone doing much better!


Wednesday, August 21, 2013

Attaching the Grow Lamp to the Wall

I had posted an entry entitled Upgrades to My Growing Area with an update about the trouble I was having getting the grow light to stay fixed onto the wall.  I first tried the 3M Command adhesive strip two separate times.  I tried thoroughly cleaning the area with alcohol, scraping the paint off the wall, and letting it cure for a longer period of time than indicated, but nothing worked.  The lamp was simply too heavy for the adhesive although it was guaranteed to hold 5 lbs and both the lamp and bulb together weighed about 2 lbs in total.  The real issue was leverage.  The extending arm of the lamp was making it unevenly heavy.

Because we have plaster walls and my landlord doesn't want any permanent holes in the walls, I cannot use anchors because that would require me to drill holes and would give me away.  These people hear everything.  After asking many friends for ideas, I decided to use 1" screws and two small brackets to support the weight of the lamp.  I had to get them in the wall with a bit of good 'ole 'elbow grease'.  As I was screwing the hardware into the wall, I noticed the screws were not really gripping onto anything solidly.  I then decided to bring in the big guns.

The next day, I got myself a small bottle of Gorilla Glue.  I had never tried this brand or type of glue, but when I read about how it was so good at filling holes, which is exactly what I needed.  The fact that it was supposed to be a really strong adhesive once it cured made it just perfect for what I wanted it to do.  I not only applied glue to the back of the brackets, but to the holes inside the wall.  The glue filled in the holes beautifully and the brackets, which were clamped down by the screws, are sturdy enough to actually hold.  I am happy to state that with my new reconfiguration of the brackets, the aid of the new adhesive, and allowing it to cure for about 48 hours, which is about double the time recommended, it finally worked! 

I used a couple of zip ties to stabilize the lamp

I will now have to pick up a small can of paint to retouch where the previous adhesive strip peeled off the pigment.


Now, this is the finished product:


The grow lamp is simply meant to supplement the sunlight on either cloudy days or during the hours the sunlight is more muted.  Therefore, it's not that important that the bulb itself is right next to the plants.  I am just so happy that it is finally staying on the wall...yay!!!


_________________________________________


Update

The lamp has been up for 2 weeks now and the bracket and screws are still firmly into the wall.  I can finally cross this off my list as a success.


Monday, August 19, 2013

Introducing Kalista!

After scouring the Internet for a week or so, I finally found a Paphiopedilum Fairrieanum.  I love their gorgeous flowers!

Hopefully, next year, I will have blooms like this

My paticular one is a Pahiopedilum Fairrieanum (fairieanum 'Red' AM/AOS x fairieanum 'OZ') from Orchids.com.  I named her Kalista, which means most beautiful one.  When she arrived a few days ago, she seemed to have had a really bad trip.  Her leaves were all mushed down and she looked a bit thirsty.  Since she arrived late in the afternoon, I unpacked her and simply added some dolomite to her media and placed her in her new spot.

The next morning, I gave her a good watering, but she still looked a bit under the weather.  It's been about 3 days since she arrived and she's starting to perk up somewhat:


I know in time, she will recover from the shipping trauma, but right now, she still has a few leaves that need to perk up:


As the saying goes; slow and steady wins the race!

Saturday, August 17, 2013

Seramis Clay Granules

Today, during one of my recurring visits to the orchid board,  I noticed someone on the forum had been raving about the Orchitop orchid pots.  They are made in Germany and not widely sold here in the US, but I managed to snag a clear one from Repotme.com.  On the Orchitop site, they also endorse something called Seramis in order for the pots to do what they were designed for.  They are clay granules, but only available in Europe.

The user on the board, who had been gushing about the pots, asked me if I was also using the Seramis granules.  I informed her that it would be impossible for me to get them in the US, but I had a similar product named Orchiata, but that it was rather expensive to use in such a large pot.  She completely surprised me when she volunteered to ship me some from the UK, where she lives.  She said the product is so ligth-weight that shipping would not be costly.  What a sweetheart! Just goes to show that people are full of surprises.  I honestly did not expect that, but since I was so curious about this product, I graciously thanked her for her generosity, and am so looking forward to my bag of Seramis clay granules.

I also learned today that the Orchitop pot is meant to be filled with the clay granules, and then watered by filling the saucer with water.  The water will wick up to the roots as needed.  This keeps the roots constantly hydrated, but also really well aerated as they were intended to grow in nature.  I will tell you, after seeing the roots of the Phals cared for by the board member, who recommended the pot and the Seramis combo, I did not dream that my Phal's roots could ever look like that.  I am definitely willing to try and see how it goes.  Right now, my Phal's roots don't look too hot in my opinion.  They are still struggling to recover from being tightly packed into Sphagnum Moss for so very long.  Ever since they were taken out of the Sphagnum Moss, they have looked a bit dehydrated on a regular basis.  The climate in my home is consistently pretty dry.  Personally, I would like to get them really nice and plump like in the picture below:


Tuesday, August 13, 2013

Marilyn is Getting Much Better!

This morning, I noticed that Marilyn had basically made a full comeback from the sad plant it was about 3 weeks ago.  Her centermost leaf was standing upright and there was even evidence of a new leaf growing within its folds.  I haven't dared to inspect the roots, but the one root which keeps peeking out the top of the pot, is now a healthy shade of brown and not entirely dried out as it was before.   The Orchiata based mix has served my Paphs well.  It drains well and yet retains some much needed moisture for them as well.

I did make some cultural changes recently.  We, orchid enthusiasts are a curious bunch, so I am constantly and eagerly scouring the Internet to learn more about the care of my plants.  I discovered adding some calcium to my media and a moss top layer would benefit the Paphs.  I also moved Marilyn back a bit further away from the window.  I think she prefers a shadier spot than where she had been initially placed.  It is a bright window, but the full on sun does not come in until much later in the afternoon, and it really does not hit the plants for more than an hour or two, but that seems to have been a bit much for her and was stressing her out.  2 of her leaves had been showing signs of drying out and became a bit leathery as a result.  I do find she does not seem to mind the grow lights at all so I did place her closer to the artificial lighting and further away from actual sunlight.  This arrangement seems to be working much better for her.

I am just glad she is much happier now.  I did not want to lose her as a result of my own growing pains.

_______________________________________


Update

So of course, as luck would have it, Marilyn had a bad relapse :( This is her leaf today:


I definitely knew something was wrong, but never in a million years did I imagine what was actually the problem.  Since I was stumped, I consulted the orchid gurus over at the orchid forum.  I was informed that sphag is not good for my Paphs at all.  What I need to add is dolomite.  I recall reading that somewhere, but there is just so many different opinions and since I wasn't familiar with the product, I kind of chose to ignore this tid-bit.  So this is what I need:


They really need to have dolomite for dummies.  Unless I searched for it online under keyword dolomite, and got the above product as a result, I would've walked right past this product on a store shelf without knowing this is what I actually needed.  In any case, during lunch tomorrow, I will be picking up my bag of dolomite.  I was also advised to do the same thing with the rest of my Paphs.


_______________________________________


Update - August 17, 2013

This is Marilyn today after her watering:


I would say the dolomite was definitely a success!

Sunday, August 11, 2013

Moss Top Dress for Paphs

After doing some research online, I found out all of my Paphs (Paphiopedilums) need a calcium top layer above their media, particularly since our NYC water is so pure.  In their natural habitat, they grow in places where there are plenty of nutrients being washed onto them from the trees above.  They also tend to grow on or in between the rocks with limestone, dolomite, and other minerals.  So, it is important to routinely add calcium to the media.  From my readings, this top layer should be replaced at the beginning of each season.  Since my oldest daughter has a lizard as a pet, who also requires powdered calcium, I borrowed some temporarily to experiment with.

After adding the calcium powder,  I also moistened some sphagnum moss and laid it all along the top of the powdered calcium to seal the moisture into the media and protect any roots that were exposed to air from direct sun.  I also learned that this is something that Paphs appreciate since many of them grow in places where there is either a layer of leaf litter of moss growing on the rocks and trees they are close to.

If my Paphs were in their native habitat, they would all grow in India or in the kingdom of the Bhutan growing in pockets of humus on limestone mountain sides.

Wild orchids in their native habitat of the Bhutan

As with all changes regarding these slow growing orchids, improvements will be slow coming, but in the end, if it helps my plants, they are small easy fixes...so, why not?

Vino with this new top layer of moss and calcium

Rocky was also outfitted with a layer of moss and calcium

Friday, August 9, 2013

Got My Hands on a Paphiopedilum Fairrieanum

I am soooooo extremely excited.  I just purchased a Pahiopedilum Fairrieanum (fairieanum 'Red' AM/AOS x fairieanum 'OZ') from Orchids.com.  I had been searching for one for a bit and even reached out to a few vendors and everyone was sold out.  The best part is I was able to purchase a mature plant so it will be much more resilient...yay!


I cannot wait for it to arrive during the 2nd week in August.  By then, I should have all the lighting and humidity culture all worked out.

Wednesday, August 7, 2013

And Here's Rocky!!!

Recently, I ordered a species Paph named Paphiopedilum Sanderianum from a vendor based out of California, near San Francisco.  I was so very excited.  After all, the plant was advertised as being BS (Blooming Size), which means by next season it should be ready to bloom, and he described it as being physically 'nice' and very easy to grow.  I gave the grower my credit card number, address, and waited for my beautiful plant to arrive.  The picture he had on his website to show the plant was similar to this one:


What a beauty, huh? Yeah, that bloom certainly is! Even the plant is supposed to be quite striking; so healthy and vibrant:


 However, what I got was this:


The plant actually looks much better now that I removed several leaves with some areas of mystery very dark brown stuff that I wasn't sure if it was some type of fungus, rot, or severe sunburn or scale.  There were dozens of little holes in various sizes clearly showing some parasite or insects had made a meal of this particular plant.  I immediately dipped it in Physan 20, but this time, I used it at a much more diluted ratio, and left the plant sitting in a bucket for a good half hour or so.  I also cut away everything (leaves and roots included) that looked rotted or suspect.

The roots were in terrible shape.  Most of the roots near the base of the crown were completely rotted and black  There were more unsheathed wiry centers rather than viable roots.  I repotted the struggling plant in a 3" clear pot in an Orchiata based mix.  I took the precaution of treating the media itself with Physan 20 as well.  I didn't want to take any chances with this plant.  It was in such rough shape and I didn't want it introducing something that would wipe out the rest of my plants.

Normally, I would've sent the plant right back, but since the vendor is based in California, frankly, I am not sure I will be able to get my money back.  He seemed to think this plant was acceptable to sell.  How do you reason with that? To be quite honest, I was really upset, but decided to make the best of it, and simply pruned, treated the plant with the fungicide disinfectant, and repotted it.

I decided to name it Rocky because not only is it off to a rocky start, but if it does bounce back, the plant is definitely a fighter:


Only time will tell what will be Rocky's fate, but jeez, I feel totally cheated on this deal!


________________________________________________


Update

A few days later, I spotted the beginnings of some mealybugs setting up shop on my plant.  I immediately mixed a homemade alcohol and soap mixture and sprayed it all over the foliage.  The next morning, I also gave him a brief shower in the shower stall with our massaging shower head.  Who knows maybe it need a massage? (j/k)  But, in all seriousness, I have continued watering this way just to ensure the little buggers get the message loud and clear that they are not to return.

I am hoping this will be the end of the tribulations with this plant.

Tuesday, August 6, 2013

Upgrades to My Growing Area

The first thing I did was to buy some real humidity trays.  I didn't mind having the homemade tray with the stones, but it made the weekly cleaning a sheer nuisance.  The other disadvantage was that the tray I had previously was about 13" L x 10.5" W.  It barely fit the 3 pots I have now.  The stones also made the pots wobbly, which was also rather annoying.  The new trays with the plastic grids will hold much more water and keep the plants level.

I ended up purchasing 2 Humidi-Grow Humidity Trays from Repotme.com:


I know many growers do not believe that humidity trays help much.  I cannot make a strong case to oppose or promote the trays based on my own experience just yet.  I did measure humidity with a hygrometer during a sunny and warm day, and found that the RH (Relative Humidity) had gone up by about 4.5%.  This isn't a huge increase, but I do feel that every little bit helps.  The main draw for me this time was since one of my end tables also doubles up as my growing area, the trays help protect the furniture from water damage.  These new trays are also 2.5" deep and raise the plants a bit higher so the sun from the window is more evenly spread over the foliage.

Right now, things are ok, but I worry about the Winter.  Already, I am starting to notice that the exposure to the sun is decreasing gradually in my growing area.  I am surmising that by the time Fall rolls around, the sunlight would practically disappear, particular behind a veil of thick clouds.  So, of course, this made me realize that a good grow light would supplement whatever natural light comes in from the window.  I am also hoping that this will aid in Marilyn's recovery.  I think part of the problem now is that she's not receiving enough light to thrive.

I researched various options.  I wanted something that would not be a big hassle to install, and that would not be a horrible eyesore since this setup is going in my living room.  I was also looking for something affordable and that would not be a fire hazzard.  I had to ensure whatever choice I made that it would not be dangerous to the cats either.  The best solution to fulfill all my criteria was a regular clamp light with an aluminum reflector.  For obvious reasons I chose one that had the on/off switch away from top of the lamp itself:


The next item was the bulb.  There are quite a few choices.  I chose the Feit 40W 120V 6500K Daylight CFL:


Not only  is this a full spectrum bulb so it eliminates the needs to have various light hues on at the same time, but the bulbs never reach dangerously high heat levels.  I eventually would like to automate my lighting solution so I purchased a timer.  I selected an outdoor one because they are more compact and won't take up more than one outlet at a time:


The last item I ordered was a humidifier for the plants as well as for us humans.  I had an awful time last year with my allergies, and the dry heat during the winter time was wreaking havoc on my sinuses.  I have one at work just like this, so I stuck to a model I had experience with:


This is the new revamped growing area with the new humidity trays before I received all the stuff above:


And here is the reworked growing area after everything came in:

I had to turn off all the lights in order to take the pictures


I will keep experimenting with light until I can get it down pat.

______________________________________________

Update

I had adhered the lamp fixture wtih a large 3M Command hook.  I am not sure if it was due to the weight of the lamp and bulb although both things combined should come in under 2 lbs and the hook is certified at a 5 lbs limit or maybe the humidity from the humidifier so close by, but I found it had collapsed onto the table hook and all.  To be honest, it did not look like the adhesive had given out as much as the multiple layers of paint that had not adhered correctly onto the wall and made the wall unstable for this type of setup.

I went ahead and scraped all the remaining paint off of the small piece of wall which the adhesive strip would cling to and thoroughly cleaned it with alcohol as per the instructions that come with the hook.  I also adhered the strip to the back of the plastic that will hold the hook and clamped it down with binder clips to ensure there were no air pockets that could compromise this new install.  After 2 hours or so, I went ahead and stuck the plastic holder to the wall itself and manually held it down for a good 60 seconds or so.  I then let it sit overnight without bearing any weight at all.

This morning, I placed the hook onto it and will leave it another 24 hrs to set to ensure it bonds well to the wall.  So, tomorrow morning, I will hook the lamp back on and this time, I also plan to secure the clamp to the hook with some zip ties just to ensure the weight is more evenly distributed.  I am hoping that after all this, the darned lamp will stay on the wall :)

Monday, August 5, 2013

Audrey Comes Home!

I really tried to do the best I could with Audrey at work.  At first, it was ok, but lately, her roots have been looking a bit worse for wear.  She went through most of her blooming cycle and has retained a few of her dainty flowers.  But as far as her roots, I suspect they are sunburned.  Currently, I still time share a window at work, and since the executive that occupied that office was out on leave,it worked out perfectly.  However, since the person retired recently and now the office is slated for another occupant, they may not be as flexible...and then what?

Since I purchased the new humidity trays and have revamped my setup at home, I have discovered I actually have a limited amount of additional space.  This being the case, I decided to just bring Audrey home.  In my apartment, I will be able to give her more dedicated care and repot her into something smaller. 


I think the 2 main reasons she is skating by is that the window exposure may be too much during the weekends when I am not in the office, and since she is potted in a larger pot, the soil remains wet at the bottom and dries up where the sun hits it.  By the time, I come in on Monday, the top most soil, and where the roots are exposed to air, are totally bone dry while the soil in the bottom 3" - 4" of the pot are still quite wet.  In order to avoid rotting the roots, I usually wait to water her, but she is probably really thirsty by then, and since there is no breeze, it takes the medium a lot longer to dry out at the bottom.

Audrey's sunburned roots

In the office, I don't have a dedicated fan for her so she really does not get too much air circulation.  All this can be controlled much easier at home.  To be able to do this in the office, I would have to make a substantial investment in a quality fan and grow lights since I won't have access to a window any longer.  Besides, I am not even certain how well a grow light, despite choosing one that would blend in with the decor, and would be rather inconspicuous, would be received by my coworkers.  Not to mention, I would have to reorganize my workspace entirely to make this work.

So taking all this into consideration, and the fact that Snow White is doing so well at home demonstrating I might have finally gotten the Phal basic care down pat, I think it is the most prudent choice.
________________________________________________

Update

That evening when I got home, I repotted Audrey into a 4" nursery square pot.  Her roots were actually in pretty good shape.  The ends were not rotted just the roots near the base of the crown were scorched by the sun.


I am certain she will be much happier in this much smaller pot.  And since I can't resist...one more closeup look at those pretty little flowers!